Installation procedure
Installation
This process of installation are not for the faint of heart. This is a python application with no installation or configuration script, you have to do many tasks by yourself. In a nutshell, you have to do the following:
- Install Python
- Create a directory in the target system
- In that target system, create a python environment
- Download the source code of the application
- Customize the
config.yaml,logging.jsonfiles - Create a project in google cloud console. In that project,
you will have to:
- YAVEREMOS
Install Python
Python version 3 must be installed to make this application work.
Create a directory in the target system
Just to keep things clean, you will have to create a directory in the target system to keep things clean:
$ mkdir changeMonitor
$ cd changeMonitor
OPTIONAL: Create a python environment in the target system
Once you have python installed, I recommend to setup a virtual environment to make this changeMonitor working. This will avoid possible conflicts with dependencies from other projects.
After that, create a virtual environment. For this example
we will call it .env:
$ python -m venv .env
Next step is activate this virtual enviroment, by running the
activate or activate.bat command. You will see that
this is achieved because the prompt will change:
$ cd .env
changeMonitor/.env# source ./bin/activate
(.env) changeMonitor/.env# cd ..
(.env) changeMonitor#
The next step is to install the following packages:
pip install --upgrade google-api-python-client google-auth-httplib2 google-auth-oauthlib
pip install oauth2client
pip install pyaml
pip install pathspec
Download the source code of the application and config files
The following files are needed for complete an installation of
changeMonitor:
example.db
example_config.yaml
example_logging.json
changeMonitor.sh  # if your destination system is Linux/Mac
changeMonitor.cmd # if your destination system is Windows
main.py
gmail.py
Customize the config.yaml, logging.json files
logging.json
The entry filename must be configured to indicate where the log files
will be placed:
"filename" : "changeMonitor.log",
Initially you can configure the error level to DEBUG:
"level" : "DEBUG"
And when it's working smoothly, you can change back to ERROR.
BTW, you can configure the maximum size of the logging file and the number of log files to keep.
config.yaml
Create a config.yaml file by renaming the provided example-config.yaml:
$ mv example-config.yaml config.yaml
Configure the paths to monitor
The list of paths to monitor is given under the key paths_to_monitor:
paths_to_monitor :
    "/path/to/a/website":
        # configure here what extensions you want to monitor
        # (or not to). For instance, to monitor every PHP file
        # inside /path/to/a/webiste, just add "*.php" (like
        # the one set below)
        # you can also avoid certain files, like the example
        # of the README.php file
        files:
            - "*.php"
            - "*.html"
            - "!README.php"
        # here you have to configure what directories you want
        # to ignore. The directories are checked by regular
        # expression, so regular expressions can be used to
        # match multiple directories.
        # For instance, "images?" would match the directories
        # "image" or "images"
        directories_ignored:
            - "/images"
The directory itself is given as key (/home/rluna... in the example).
Under the key files you can place what kind of files you want to
monitor. For instance:
files:
    - "*.php"          # will monitor every php file for changes
    - "!README.php"    # but not the README.php file
Or:
files:
    - "*.*"             # will monitor every file
You can create a directories_ignored entry to identify what directories
must be ignored under the specified directory.
Configure database location
ChangeMonitor keeps a signature of every scanned file in a sqlite database, so it's very important to have it properly configured.
The location of the database is specified under the key database:
# changeMonitor uses a database to store the files and a
# md5sum of the file; here you have to set where the
# database is located
database: "/path/to/your/database/example.db"
It is also given an empty database file called example.db. You should change
the name:
# mv example.db changeMonitor.db
And configure it accordingly in the database key of the config file.
Configuration of the installed key
Under the installed must go an app registration information taken form
google cloud console.
Email configuration
Under the key email are place the subject, body remitent and addressee
of the various emails sents by the application. They are auto-explicative.
Linux/Mac users: changeMonitor.sh
You have to configure properly the script changeMonitor.sh. Edit it, and
perform the following change:
change_monitor_home="PUT-HERE-THE-HOME-OF-YOUR-APPLICATION"
This is the directory where you have created the virtual environment.
VERY IMPORTANT FOR LINUX/MAC USERS: give execution permissions to this script by running:
$ chmod u+x changeMonitor.sh
Windows users: changeMonitor.cmd
The same changes done for the linux script have to be made for the windows users on this line:
set change_monitor_home=CONFIGURE HERE
And we are ready to run
Now you can run the application like this:
$ ./change_monitor.cmd
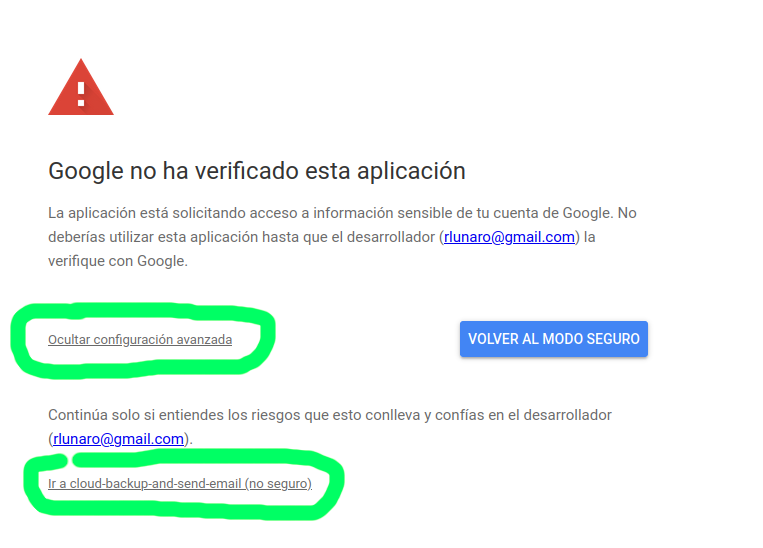
Running for the first time
The first time you run the application, it will request for permission to access your google drive and gmail showing a screen like this: